This post originally appeared on Marketplace Advertiser, QuantumListing Blog and is republished with permission. Find out how to syndicate your content with theBrokerList.
http://quantumlisting.com/uploads/fs/blog/do55a7cf9c71f1c9c495413f934dd1a158_small.jpg

Not only does the sidebar menu on your QuantumListing profile page provides the tools you need to get your commercial real estate haves and wants up on our site, it also does a lot more. Read on to find out exactly what you can do.
When you sign up for QuantumListing, you are immediately directed to your profile page, the launchpad for your QuantumListing experience. From here, there are a number of places to move forward whether you want to start adding listings, searching for your next space, or adding content to your profile in order to help increase your search engine visibility.
The first place to direct your attention is the sidebar menu on your profile page, which leads to several important tools and aspects of the site.
While the sidebar menu on your QuantumListing profile page differs depending on which membership type you select, all of them will include a few of the same tabs.
Lets Take a Closer Look
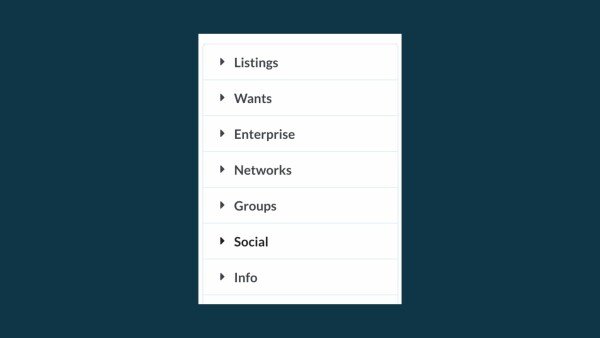
For all Basic, Individual, and Enterprise members, the sidebar menu will include the following:
- Listings
- Wants
- Networks
- Groups
- Social
- Info
We’ll take you through them one by one so you can get a better understanding of how to use each section.
List your Listings
The Listings tab is where you should go to add a listing (if you are a Premium member, of course). Simply click on “Listings” and select the first tab in the submenu. If you are a Basic member and you would like to add a listing, you need to click Upgrade to become an Individual or Enterprise member. For those that are Individual or Enterprise members but are not able to add a listing yet, this is an easy fix. You simply need to add your payment information to activate your membership first!
For those with listings, the second item on the submenu is Listing Archives, where you can view all the listings that you have sold or leased and want included in your archive. When you take an active listing and want to make it inactive, you can choose to archive it, as opposed to merely unpublishing it. Read more about archiving listings HERE.
Third on the Listings submenu is where you can find Saved listings. When you are looking at any listing detail page on QuantumListing, you can choose to save the listing and access it later on in your profile from the sidebar menu here.
We’ve Got What You Want
The second item on the sidebar menu is where you can find your QuantumListing Wants. All membership types can post the type of space they are searching for by creating a Want, which will then automatically appear at the top of QuantumListing’s search. While marketplaces need people to post listings, they also need to complement this group of people by providing a space for people searching for space to post. Just like listings, you can archive your Wants and you can also save any Want, whether it is your own or somebody else’s that you found on the search page.
Very Enterprising
If you signed up for an Enterprise account, you’ll find a section in the sidebar headed Enterprise, which is not included in Basic or Individual accounts. Clicking here lets you add Managers to help with the workflow and Agents, so that you can handle everyone on your team’s listings with a single log in.
Learn more about why we created Enterprise accounts and what you can do with them HERE.
A Work of Nets
All QuantumListing members get added by our team to a network based on their geographic area. Users can also request to join additional networks. In order to see what Networks you are currently part of, you can click on “My Networks” under the Network sidebar menu tab. From here, you can also see other Networks and request to join any that you are interested in! When you click on Network Listings, you can look at all of the listings posted by other members in your network(s).
From here, you can look at any listing detail page to learn all of the information about the listing. You can also favorite a listing by clicking the ribbon button or you can look at the profile of the member who posted the listing by clicking the profile picture or avatar in the top left corner of the listing card. Another helpful tool here is the ability to filter your network listings by location, asset type, trade type or even sort by price or size.
Underneath Network Listings, you can check out Network News which gives you updates on the most recent changes. This is a great way to see what new listings have recently been added in your market and also see what listings have had changes, perhaps a decrease in price.
Let’s Group Together
Another way to stay up to date with other members in your market is by using QuantumListing Groups, which is the next section of the sidebar menu. Just like Networks, we have created a group for every state in the U.S. and we even have additional groups for specific asset classes, as well as for certain teams and companies. On the Group section of the sidebar menu, the first tab that you can check out is Feeds, which updates you on your group members’ activity.
Below that section is “My Groups” where you can see all of the groups you are currently in and also join new groups or remove yourself from a group. If you want to check out the other commercial real estate professionals in your groups, you can do so by clicking Group Members. From here, you can also filter by Group Type if you are in multiple groups. Additionally, you can use this section to search for another group member by typing in the section “Enter user name.”
By clicking Group Listings, you can look at all of the listings by other group members. You can also filter by group once again to drill down specifically to one market.
Social Butterflies
As you may be able to tell from the two aforementioned menu items, Networks and Groups, QuantumListing is a social site by nature. Within both of these sections, when you clicked on your Network or Group Members you could then go to each member’s profile. When you are looking at another member’s profile, one of the first call to action buttons you may see is a green Follow button. When you click this button, you will be notified that you have started following this user. Then, when you click the next menu item, Social, you will see that it has listed you are now following 1 user (unless you have followed other members already, in which case it would be more)! When you follow somebody, their notification bell will light up and read “New user is now following you. Click HERE to follow them back.” Once they click that button, your Followers submenu will now read 1, and you officially have your first follower.
One of the many benefits of following other users is that you can create a stream of listings that you can check out anytime in the Stream submenu under Social. This is the same concept as when you follow people on Instagram, in which your feed or stream consists of the content posted by those you are following.
The Quantum Info Desk
Last but certainly not least is the Info section, which is known most for providing access to analytics. This means you can see all of your listing view counts as well as the statistics on anything you have chosen in our Marketing Center, including Listing Promotion, Brand Promotion, or Online Advertisement.
A fun part of the Info section is where you can see all of the notes that you have created on listings. When you are on any listing on QuantumListing, you can add notes about the listing, whether it is your own listing or posted by another member. These notes can consist of anything that is important to you, including reminders, to do’s, names of key individuals, rent costs, subleases, and more. Your notes are private and visible only to you. Once you make a note, you can then access it under the Notes in the Info section.
Under the Info section is also where you can find all of your Syndication channels and choose to connect with CRE Collaborative or Leavitt Digital. As a reminder, we are also syndication partners with SharpLaunch, Buildout, and RealNex, which means their members can send their listings to us and then the listings will update in real time on our site.
Another one of the most important parts here is the Leads section where you can check out who has requested more information on your listings. You will also receive email notification about leads, but it is nice to manage them all under your Leads section. Make sure that your membership is up to date so that you can get access to all of your leads and analytics.
The last part of the Info section is Orders, where you can check out your entire history of membership as well as any aspects of the On Demand Marketing Center that you have tried out.
How Can You Learn More?
For some, the best way to learn is by doing. Just click on the different items and see what they look like and play around with them. You won’t break anything.
Others are visual learners, and they can watch the replay of our webinar on QuantumListing profile pages by clicking HERE.
For those of you who prefer to read about things to get a better understanding, we have a category of topics in our How It Works section dedicated to your Profile Page, in which you can find articles about the sidebar menu. Visit that by clicking HERE.
If you prefer a one on one hands on demonstration, you can schedule a demo by clicking the green Schedule a Demo button at the top of our website or clicking HERE.